Trip Element Quick Start
Get up and running in 5 minutes
Trip Element
Implementing the Trip Element with the SDK is quick and simple.
In the following guide, we will show you how to embed the Trip Element on a page in 3 simple steps.
We will also show you some additional customization options for more advanced users.
Video Link
Below you can find a video walkthrough of this Quick Start:
Step 1: Setup sherpa° SDK
You need to include the sherpa° SDK by adding the script tag to the head of your HTML file and include your unique APP_ID provided by sherpaº.
You will need to select the appropriate URL and APP_ID depending on whether you are using our Ssandbox or Production environment:
<!-- PRODUCTION Environment -->
<script src="https://sdk.joinsherpa.io/widget.js?appId={{APP_ID}}" defer></script>
<!-- SANDBOX Environment -->
<script src="https://sdk-sandbox.joinsherpa.io/widget.js?appId={{SANDBOX_APP_ID}}" defer>"</script>
Step 2: Place tag
Place an empty <div> tag on your page where you want the Trip Element to appear.
<div id="sherpa-trip-element"></div>
Step 3: Create element
Use the sherpaº SDK to create an instance of the Trip Element and mount it to the <div> tag you created in step 2.
const elementConfig = {
  placement: "discovery"
}

function onSherpaEvent(event) {
// Ensure that the sdk is loaded before creating the element:
  if (event.type === 'sdkLoaded') {
		$sherpa.V2.createElement('trip', elementConfig).mount('#sherpa-trip-element');
  }
}
You should see the Trip Element appear on your page.

Personalization
To provide the best user experience, you can pre-fill the Trip Element with a traveller's details.
In the example below, we will pre-configure the following parameters for an eVisa & Travel Requirements Trip Element:
- Element placement
- Traveller's nationality
- Origin
- Destination
- Departure and arrival date
- Flight number
Choose which properties to pre-configure
In the example below we are pre-configuring the above properties that are common in a Manage My Booking (MMB) page. These were chosen for demonstration purposes only. For your use case, you can choose to pre-configure all, some, or none of these properties
The data passed as a part of configuration will also be used to pre-fill the application of the traveller. This will reduce the probability of mistakes and the application time, and ultimately lead to a better user experience.
const elementConfig = {
  // 1. Element Placement: Where the Element is being placed on your site e.g. mmb, discovery
  placement: "mmb",
  travellers: [
    {
      // 2. Define the traveller's Nationality:
      nationality: "USA",
    }
  ],
  segments: [
    // Outbound Segment
    {
      segmentType: 'OUTBOUND',
      // 3. Define Origin Airport:
      origin: {
        airportCode: 'JFK',
      },
      destination: {
        // 4. Define the Destination Airport:
        airportCode: 'HAN',
      },

      // 5. Define the Departure & Arrival Date
      departureDate: '2022-11-25',
      arrivalDate: '2022-11-25',
      // 6. Set the flight number
      flightNumber: 'AB123'
    },
    // Return Segment
    {
      segmentType: 'RETURN',
      origin: {
        airportCode: 'HAN',
      },
      destination: {
        airportCode: 'YYZ',
      },
      departureDate: '2022-12-02',
      arrivalDate: '2022-12-02',
      flightNumber: 'XY4321'
    }
  ]
}

function onSherpaEvent(event) {
  // Ensure that the sdk is loaded before creating the element:
        if (event.type === 'sdkLoaded') {
          $sherpa.V2.createElement('trip', elementConfig).mount('#sherpa-trip-element');
        }
      }
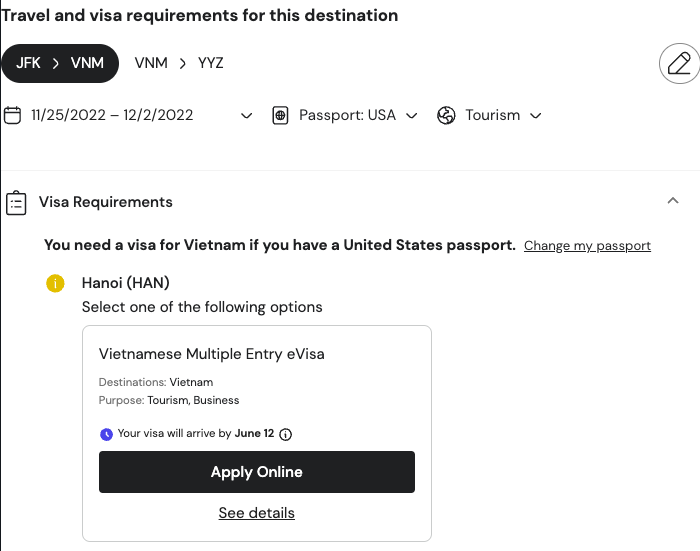
The output of the above example is shown below:
Updated over 1 year ago